
The Actual News:
Just gonna keep this post a quick one, because there really isn’t much to share… BUT! Since Wednesday I’ve been working on a small little project, just to see if the energy put into it would be worth developing into its own YouTube series. Long story short: it is!
But first, check this out:
Time to #solder! Fixin' an old #sega #gamegear … good times? Well, as long as I'm not breathing in the burning flux! pic.twitter.com/fPZhkCSW1n
— Pokémon Aaah! The Tweeting Account (@AaahPokemon) March 4, 2021
Just so you know, the filter mask was to above breathing in all that burning wires and flux. That stuff’s naaasty. Anyways, that picture was taken at the start of it before I did anything… and the video below is the end result of all my work:
Sorry, I'm just a WEEEE bit ecstatic about getting my #Sega #GameGear fixed, especially since this is the first time I actually ever repaired anything like this. pic.twitter.com/pRpijfG2La
— Pokémon Aaah! The Tweeting Account (@AaahPokemon) March 5, 2021
As you can tell, I’m a WEEE bit giddy about this! But here’s the details:
So among the many YouTube series ideas I have in mind, one of them will be called “From Scratch”. Like, imagine you get gifted a game console, a handheld, etc, or you find one at a thrift store… and you know absolutely nothing about it. All you’ve got is a system and a bunch of question marks. Well fret not! That’s where my “From Scratch” series will come in: I’ll tell you EVERYTHING you need to know to get your newly acquired console up and running… from scratch. Get it?
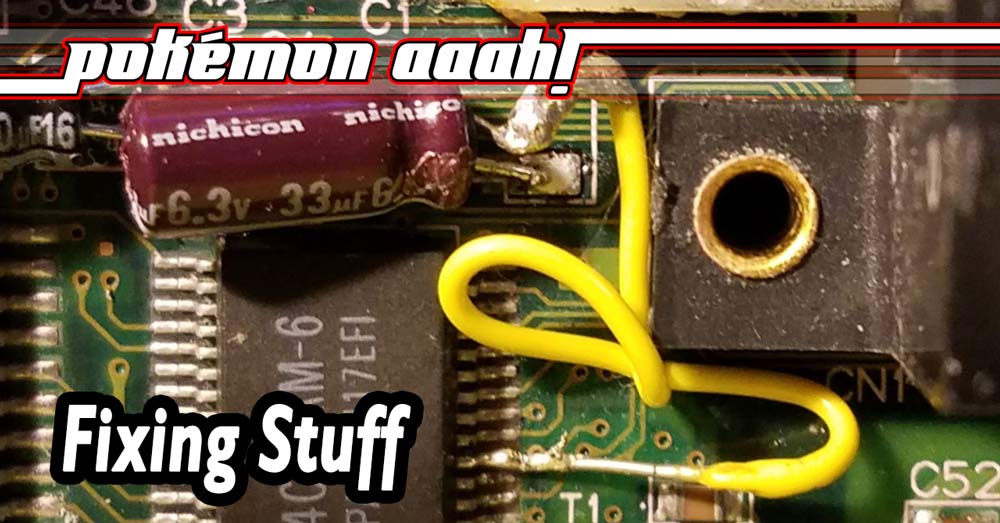
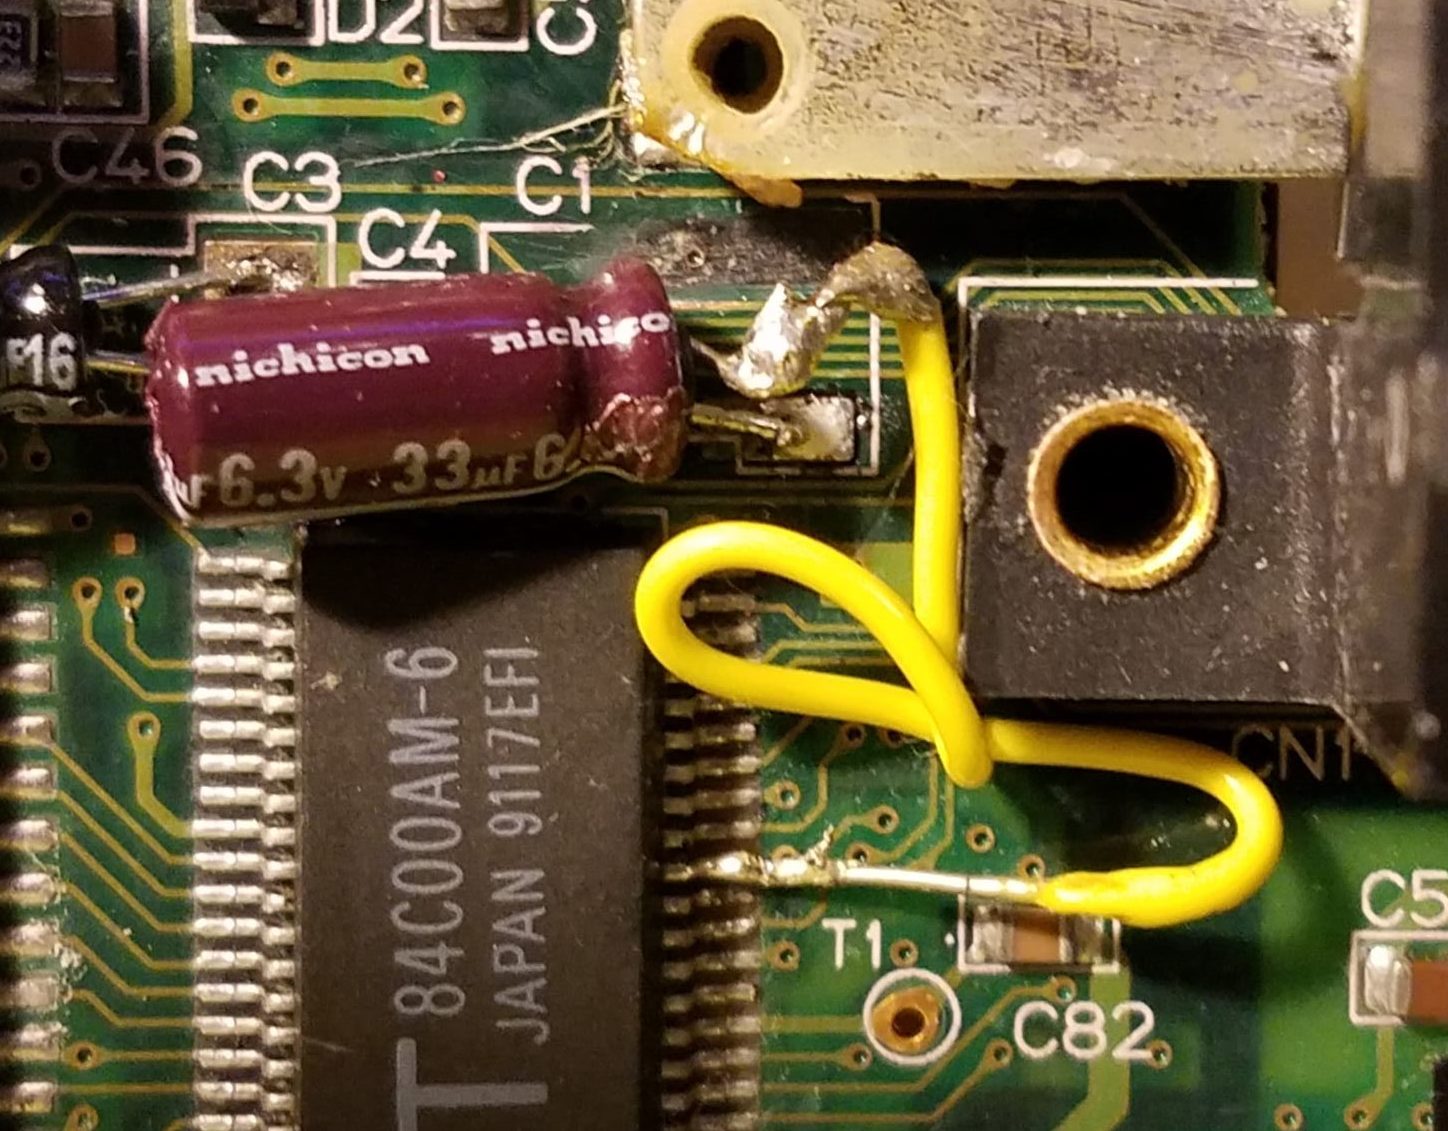
Well the first episode will be about the Sega Game Gear, which I incidentally acquired three of them over the years. This first one was perhaps the most damaged, so I wanted to test it out to see if I could actually fix it. And, well, I could! Heck, I even managed to jury-rig a solution after I accidentally pulled a trace pad:
…
You can see the pulled the pulled trace pad area right in the upper-center portion of the picture (to the bottom-right of the text “C1”).. but what I was able to do was put my multi-meter into “Continuity Mode”—which allows me to find a direct line connection between the positive and negative leads—and find the location where that trace pad is supposed to be connected to… which ultimately ended up being that particular pad of the 84C00AM-6 chip there. What was even more complex was trying to get the solder to fix that very thin line, seeing as my soldering skills are still at the “giant blob” stage. Trying to fix this broked trace was almost literally two-thirds of my entire effort… so you can imagine my pleasure upon finding out that, in the end, everything worked.
If this all that techno mumbo-jumbo sounds Greek to you, don’t worry, I’ll explain all this in the episode. The point is, I fixed this Game Gear to prove to myself that a complete soldering noob like myself could do it… and if I could do it, so can you! This will therefore make an entire series of From Scratch projects totally feasible and worthwhile. HUZZAH!!
…
OK, that’s it for now. I’ll be back later on Friday to share with you some more really awesome Sinnohese research that has been building up for the last couple days. See you then!
2021/03/06 EDIT
OK so when I originally bought one of my Game Gears from Savers, the system came with a SEGA PowerBack unit, which actually could still charge up after all these years. In fact, while I was working on this re-capping project, I dug up the PowerBack so I could use it again. I plugged it in over night, and saw that it was charging just fine… and so I thought to myself “wow, that’s actually pretty lucky that a nearly 30-year old rechargable battery still looks as good AND works as well as it used to, as it STILL hasn’t started bulging like old batteries tend to do!”
Yeah, well, knock on wood… when I went to check on it this morning, I noticed that the case had split open, because the batteries had bulged like old batteries tend to do:

…
Fortunately it’s at least still holding its charge and my Game Gear is playing just fine, but this is basically the last charge those actual physical batteries will ever hold.
Now since my confidence in soldering stuff from scratch is at an all-time high, it looks like being able to repair the PowerBack by replacing the actual physical batteries will be a cinch; all I need to do is find another 7.2 V battery with a capacity of at least 1300 mAh that could fit inside this space (about 5″ × 1.5″ × 0.75″ in FREEDOM UNITS, or about 130 × 36 × 18 mm), de-solder the old Ni-Cd battery from the PowerBack, and then solder in the new battery in its place. Now this particular battery seems to fit the bill so I’ll probably get it once I get a few extra bucks; it has the same voltage AND a better mAh rating—1600 mAh, which allows for longer playtime—and its physical dimensions are below my requirements. Once I finally get it, I can then follow this video’s instructions to get it working:
…
One thing I just thought of is… hopefully the SEGA PowerBack itself has circuitry to help with the differing voltages—as the SEGA 2103 AC adapter is 10V while the PowerBack’s batteries are 7.2V—but then again, I’m sure that’s all be figured out. I mean, otherwise they would’ve been using a 9-10V Ni-Cd battery to begin with!
On the flip side, seeing as the whole point of this PowerBack battery fix is to account for the GameGear’s rather terrible battery life, I could just forego all of this and simply install a USB-C power mod, allowing me to run my Game Gear off any ol’ USB-C cable:
On top of this, if I just happen to not have a USB-C cable handy and/or otherwise want to stick with the classic six AA battery set-up, I’m damn near positive that the Game Gear’s battery life would be further extended by replacing its original backlight—which is an actual fluorescent tube—with a mere $10 LED backlight:
…or by smply replacing a McWill LCD screen which is its own backlight:
After watching this McWill LCD mod video, it actually ended up being a lot easier than I expected, so I’ll definitely end up doing this once I get a few extra bucks. At least I’ll make it part of the “SEGA Game Gear: From Scratch!” episode.
Ultimately tho, I still have two other Game Gears which need repairing, so it’s not like doing the PowerBack battery repair will go to waste. But seeing as I won’t be doing ALL of these mods at once, and some are more expensive than others, the ability to utilize any of them (no matter how little I actually end up using them for) instead of having to wait on repairing non-working units makes doing these repairs/mods worth it in my eyes. Better to have it and not need it, then to need it and not have it, y’know?